Part 1: Assignment Specification
This page contains the tasks you’ll need to complete part 1 for this assignment, and how you’ll be assessed.
- 1. Getting Started
- 2. Tasks
- 3. Titbits
- 4. Blogging
- 5. Assessment
1. Getting Started
Section titled “1. Getting Started”You can access your repository through the course website
For this assignment, you will need to make a blog post which contains the answers to questions and links to your code changes. You can view instructions and templates for this blogging here.
You can also check out this video to help you get started on part 1 of the assignment.
2. Tasks
Section titled “2. Tasks”This part of the assignment consists of two core tasks. We strongly recommend reading the entire specification before starting, as earlier tasks may introduce design decisions or code that influence later tasks.
2.1. Task 1) Code Analysis and Refactoring (30 marks) ⚙️
Section titled “2.1. Task 1) Code Analysis and Refactoring (30 marks) ⚙️”In this task, you will need to analyse the design of the monolith, including the patterns and smells present in the implementation, and apply refactoring techniques discussed in the course in order to improve the quality of the code.
Instructions for Task 1:
Section titled “Instructions for Task 1:”Put all of your answers to the following theory questions in your blog.
For each refactoring change, before you start coding take some time to plan and write up a design in your blog post. This does not need to be very detailed, and is mainly to help you organise your design. Some things you might want to include:
- What fields/methods you will need to add/change in a class
- What new classes/packages you will need to create
- Why this is the best solution to the problem (is there a smaller/simpler solution that doesn’t work?)
If you change your design along the way, make sure to keep the blog up to date!
All your work for each task (e.g. 1a, 1b, 1c) needs to be completed in a separate branch - DO NOT do all your work on the main branch.
After you finish coding, make a Merge Request into the
mainbranch of your repository with the following:
- A meaningful MR title that includes the task name (e.g.
Task 1C complete)- A brief description which outlines the changes being made
- Make sure to keep the MR cohesive - only one subtask should be in each merge request (i.e., Task 1C and Task 1D should be in separate merge requests, but ALL of Task 1C should be in the same merge request)
- Make sure all the Continuous Integration checks (regression tests, linting, coverage) remain passing.
Make sure to do this for each part of the question - if you don’t you will lose marks. You MUST merge the branch in - we will not mark anything left in an open merge request.
Updates to your blog do not need to go in the relevant branch (but you are free to do so).
2.1.1. a) From DRY to Design Patterns (6 marks)
Section titled “2.1.1. a) From DRY to Design Patterns (6 marks)”Make sure to switch to a new branch before starting this task!
- i. Look inside
app/src/main/java/dungeonmania/entities/enemies. Where can you notice an instance of repeated code? Note down the particular offending lines/methods/fields. - ii. What Design Pattern could be used to improve the quality of the code and avoid repetition? Justify your choice by relating the scenario to the key characteristics of your chosen Design Pattern.
- iii. Using your chosen Design Pattern, refactor the code to remove the repetition.
After you have completed this task, make sure to push your code and make the merge request on GitLab. When you are happy with the changes, make sure to merge the branch in.
2.1.2. b) Inheritance Design (6 marks)
Section titled “2.1.2. b) Inheritance Design (6 marks)”Make sure to switch to a new branch before starting this task!
Currently, there is a flaw in the inheritance structure of entities. A note from a member of the previous engineering team says:
“I don’t understand why some entities like Exit have empty methods like
onDestroy- if there’s nothing to do, why do we need a method?”
- i. Name the code smell present in the description above. Which design principle is being violated here? Briefly justify your answer.
- ii. Identify the other methods and subclasses of
Entitywith the same issue. - iii. Refactor the inheritance structure of the code to remove the code smell and design principle you identified.
After you have completed this task, make sure to push your code and make the merge request on GitLab. When you are happy with the changes, make sure to merge the branch in.
2.1.3. c) Open-Closed Goals (6 marks)
Section titled “2.1.3. c) Open-Closed Goals (6 marks)”Make sure to switch to a new branch before starting this task!
Look inside the goals package at the code provided.
- i. Do you think the design is of good quality here? Do you think it complies with the open-closed principle? Do you think the design should be changed?
- ii. If you think the design is sufficient as it is, justify your decision. If you think the answer is no, pick a suitable Design Pattern that would improve the quality of the code and refactor the code accordingly.
After you have completed this task, make sure to push your code and make the merge request on GitLab. When you are happy with the changes, make sure to merge the branch in.
2.1.4. d) Open Refactoring (12 marks)
Section titled “2.1.4. d) Open Refactoring (12 marks)”Make any other refactoring improvements you see fit to the codebase. This can include resolving code smells, violations of design principles, using Design Patterns discussed or any other general improvements to the health and quality of the code. Note that you must be refactoring the Java code - changes to the build system or frontend will not be awarded marks.
Some areas and questions you can consider:
- Consider violations of the Law of Demeter and the Liskov substitution principle.
- Collectable entities like
WoodandTreasurehave methods to do with durability and buffs, which doesn’t make sense. This could be a symptom of a deeper design issue. - The current implementation of the crafting system for buildable entities contains a significant amount of hard coding. Think about whether the current system follows the design principles you have learned — what can you do to refactor the design?
- If you run
gradle test, you will see a warning about “deprecated” methods in the codebase. What is the significance of this message? What should you, as the programmer, do with the code?
The above list isn’t exhaustive; there are plenty of other areas to improve the quality of the code. You should expect to receive half marks for this task if you only (correctly) refactor all the issues on the list — for full marks you should be putting in an equivalent amount of effort into solving problems you have found yourself.
Some hints for this task:
🥇 You don’t need to have a perfect design to achieve full marks for this task. Some code smells or design problems may be disproportionately difficult or even impossible to refactor, given the nature of the assignment. It is recommended that you aim for “low-hanging fruit” before judging if you need to attempt more difficult refactors.
🧠 Don’t make solutions to problems that don’t exist yet! :) Avoid over-engineering or over-abstracting in places where you might want to improve the design for some future change in requirements - instead improve the design of the current system. This will inherently make your software open-closed.
You’ll also want to split this task into one MR for each refactoring change you make.
2.2. Task 2) Evolution of Requirements (30 marks) 🔧
Section titled “2.2. Task 2) Evolution of Requirements (30 marks) 🔧”In this task, you must complete either Logic Switches (Option A) or Powerups and Potions (Option B). To receive full marks, you must complete Option B — Powerups and Potions. Submissions for Option A — Logic Switches will be capped at 20/30.
You do not need to do any frontend modifications for any of these tasks, and will not be assessed on any frontend material.
You should create a new folder for your tests called task2 and place all your tests inside of it.
Your marks will be capped at 50% if a significant attempt is not made on this task. A significant attempt is defined as creating all the necessary classes, relationships, and functionalities for the task. Whether your implementation is correct or well designed does not affect whether it is considered a significant attempt.
2.2.1. Task 2 Submission
Section titled “2.2.1. Task 2 Submission”ALL changes you make for Task 2 should be in the same merge request, linked in your blog - remember to merge in the changes once you are done. Do not merge half-completed code into the main branch. If you have already merged the task in and realise there was something you forgot or an issue that needs to be fixed, you can add it in a separate merge request (also linked in your blog). DO NOT make a separate merge request for your tests, and do not include any of your Task 1 refactors in your Task 2 merge request.
2.2.2. Software Delivery — Task Lifecycle
Section titled “2.2.2. Software Delivery — Task Lifecycle”If you’ve done Task 1 well and have a nice healthy codebase, this task should be relatively straightforward! If you’re finding parts of this task difficult to integrate with the existing design, that’s probably a sign you need to do some more refactoring.
♻️ A note about backwards compatibility:
- All the regression tests we have provided to you in the starter code (and any test you write yourself) should remain passing.
- All of the MVP configuration files (in the provided config files) do not currently contain the fields listed in the technical specification for this task. Rather than retroactively adding these fields to the existing configuration files, you will need to design your implementation to accommodate for this and maintain backwards compatibility. All configuration files in our Task 2 autotests will contain all values from Task 2 and the MVP.
2.2.3. Option A — Logic Switches (20 marks)
Section titled “2.2.3. Option A — Logic Switches (20 marks)”In this extension, you will implement a logical circuit system for Dungeonmania. This system relies on Logical Entities, which exhibit different behaviour based on whether or not they are activated. You will need to implement two new entities:
| Entity | Image | Description |
|---|---|---|
| Light Bulb |  |
Light bulbs cannot be collected, but can be lit up if they are activated. They are always created as a logical entity. |
| Wire |  |
Wires cannot be collected and are not logical entities, but act as a conductor to pass current between switches and logical entities. Any moveable entity can walk onto a wire. |
Bombs also now have the option to be created as logical entities with a specified configuration value. Bombs which have this attribute will only explode when activated. Bombs created without this value will interact with switches in the same way as they do in the MVP, and do not interact with other logical entities or wires.
Switches and wires are not logical entities, but are conductors - they activate cardinally adjacent wires and logical entities when they are switched on or conducting. Light bulbs can be activated but do not transmit current through themselves.
If a switch is activated, it sends a current to any cardinally adjacent wires and logical entities. Current can be conducted through wires and activated switches only, meaning that a logical entity may be powered directly by a switch if cardinally adjacent, or indirectly by a cardinally adjacent current-carrying wire. This allows for the creation of dungeons with logic circuits.

Assume that (1, 0) contains a boulder-activated switch. A light bulb on (3, 0) will be powered (i.e., recieve current), but will not conduct current through to (4, 0). An deactivated switch at (3, 0) will not allow an entity on (4, 0) to be powered.
All logical entities will be created in an off (deactivated) state. To activate a logical entity, ALL cardinally adjacent conductors must be activated ON THE SAME GAME TICK. Additionally, there must be AT LEAST 2 activated cardinally adjacent conductors to a logical entity for it to turn on. If any of the cardinally adjacent conductors are powered off, the logical entity will also be deactivated in the same tick.
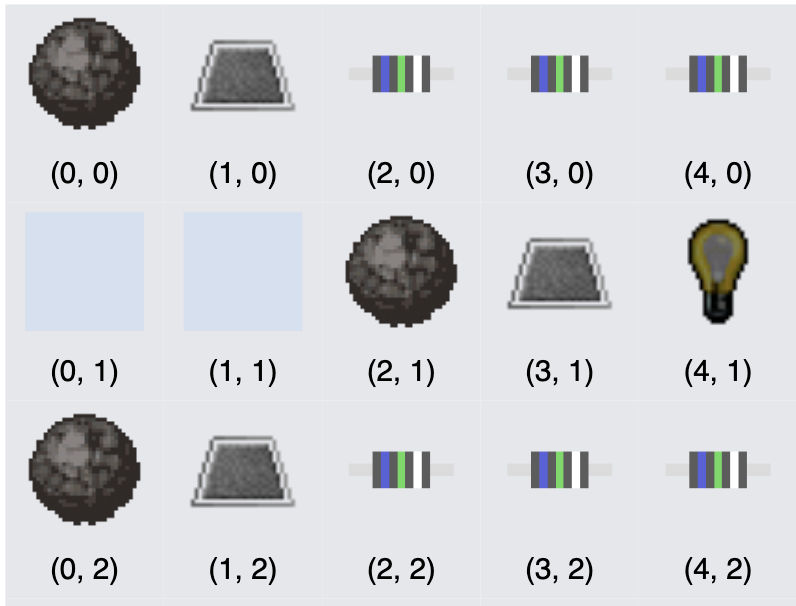
Activating the switch on (3, 1) will also activate the bulb's cardinally adjacent wires on (4, 0) and (4, 2) on the same tick, activating the bulb. If any or both of the switches on (1, 0) and (1, 2) are activated before the middle switch then the bulb will NOT turn on as the adjacent conductors are activated on different ticks.
Any other entities do not have conductive or logical behaviours when placed next to a conducting wire or switch. Note that all conductor activation should be checked before before logical conditions are computed within the same tick. Activation order of the logical entities is undefined.
In the case that another conductor powers an already activated component, the current is not ‘refreshed’ — logical entities should rely on the tick the adjacent conductor is initially activated from a deactivated state.
2.2.4.3. Technical Specification
Section titled “2.2.4.3. Technical Specification”In addition to the list of inputs in Section 4.1.1. of the MVP specification, you should now be able to handle the following entities:
| Entity | JSON Prefix | Creatable from Dungeon Map? |
|---|---|---|
| Light Bulb (off) |
light_bulb_off
|
Yes |
| Light Bulb (on) |
light_bulb_on
|
No, since light bulbs will always be created off. |
| Wire |
wire
|
Yes |
- Bombs may be created with the field
logic, which will have a value of eithertrueorfalse. If they have this field and it istrue, they are expected to be able to interact with other logical entities as described. Bombs created without this field (or with a value offalse) function as they do in the MVP and do not need to interact with other logical entities.
2.2.4. Option B — Powerups and Potions (30 marks)
Section titled “2.2.4. Option B — Powerups and Potions (30 marks)”In this task, you will be implementing a powerup system for Dungeonmania. Powerups are permanent buffs the player recieves upon killing enemies by any means, which alter how the player interacts with the game. Each different type of enemy grants the player a different type of buff, and all buffs are infinitely stackable with themselves, and each other. The following powerups will be recieved from enemies:
| Enemy Killed | Powerup Received |
|---|---|
| Mercenary |
Killing a Mercenary will grant the player the Fortune powerup. Fortune increases the amount of collectable resources (Treasure, Wood, Arrow) a player obtains when collecting those resources by 1. For example, a player who has killed one Mercenary will receive 2 Treasure if they then move onto a tile that contains treasure. A player who has killed two Mercenaries will receive 3 Treasure, etc.
|
| ZombieToast |
Killing a ZombieToast grants players the Strength powerup, increasing their physical prowess. Players with Strength have their damage per combat round increased by a flat number, stacking (e.g., a player who has killed 2 ZombieToasts will have their damage increased twice). Even if a player does not have a weapon, the Strength powerup will still apply.
|
| Spider |
Killing a Spider will give the player the Intangible powerup, which allows players to move through Walls and locked Doors. However, all great power comes with a price — entering combat with another enemy while this powerup is active will remove it. Additionally, players cannot pick up any items except Treasure while the powerup is active.
|
In addition to the powerups gained from existing enemies, there is also a new enemy being added to the game, the Assassin:
| Entity | Image | Description |
|---|---|---|
| Assassin |  |
Assassins are powerful Mercenaries, who deal significantly more damage. Additionally, Assassins cannot be bribed — attempting a bribe will waste the gold, with the assassin remaining hostile. When killed by the player, the Assassin will grant the Precise powerup, which multiplies the damage the player currently deals by 3x. This effect occurs before damage coming from weapons or allies is applied, but after the player's base damage, and additionally stacks with the Strength powerup — the order the powerups are applied will effect the final damage number.
|
For example, a player who kills an Assassin with 1 sword in their inventory will have their damage now equal to (player_attack * 3) + sword_attack. A player who first kills a ZombieToast, and then an Assassin, will have their damage equal to (player_attack + strength_damage) * 3. A player who kills a ZombieToast, then an Assassin, then another ZombieToast will have their damage equal to ((player_attack + strength_damage) * 3) + strength_damage.
To prevent players from abusing powerups to become too powerful, there are some additional rules about how powerups from killing enemies and potions the player finds interact with each other. Players are still able to use potions on any tick they like — however, while a potion is active, players cannot aquire any new powerups when killing enemies. Once the potion expires, players are once again able to obtain powerups when killing enemies (except if a new potion is queued, in which case it will become active when the old potion expires and players will still not be able to acquire powerups).
Note that since this task modifies the behaviour of the MVP entities, a correct implementation might result in some of the existing MVP tests failing. You are allowed to modify these failing tests/configuration files so that they are aligned with the new specification and are passing again, however you should take care to ensure your design is actually following the specifications correctly.
2.2.4.1 Technical Specification
Section titled “2.2.4.1 Technical Specification”In addition to the list of inputs in Section 4.1.1. of the MVP specification, you should now be able to handle the following entities:
| Entity | JSON Prefix | Creatable from Dungeon Map? |
|---|---|---|
| Assassin |
assassin
|
Yes |
In addition to the list of configuration fields specified in Section 4.2.1. of the MVP specification, Dungeonmania should also accept the following fields:
| JSON Format |
Description |
|---|---|
assassin_attack
|
Attack damage of the assassin. |
assassin_bribe_amount
|
The amount of gold required to perform an attempt to bribe an assassin. |
assassin_health
|
Health of the assassin. |
strength_damage |
Amount of damage the Strength buff grants the player |
3. Titbits
Section titled “3. Titbits”3.1. Git Practices 🧭
Section titled “3.1. Git Practices 🧭”- We will not be assessing your commit messages, though for the sake of good practice you should write meaningful commits.
- The main branch should always remain stable - the pipeline should always be passing. You are welcome to comment out some of the example tests we have provided until you can get them working locally.
- When putting up Merge Requests, all changes in the diff should be relevant to the task which they relate to (not polluted with irrelevant changes, as this makes it difficult for reviewers/markers)
3.2. Assumptions 👾
Section titled “3.2. Assumptions 👾”As you develop your implementation of the tasks, you will undoubtedly come across scenarios where some behaviour is not properly defined by the specification. This is a complex assignment - if we defined every possible scenario, the specification would go on forever. Unlike previous courses, this one is about design. We are not trying to catch you out by testing every imaginable edge case. The autotests are there to verify that you have followed the specification and completed the work, not to trip you up on obscure edge cases.
Here are the steps you should follow if you are unsure about something in the spec:
- Double check the spec, do a ctrl/command-f to check it isn’t mentioned elsewhere, in a lot of situations this will be the case.
- Make a post in the forum (please search first) asking the Course Staff whether you are able to make an assumption about the behaviour in this case. We will either:
- Approve the assumption and add to the Approved Assumptions section
- Update the specification if appropriate, or
- Respond explaining how the behaviour is defined in the scope of the specification.
Any ambiguities/assumptions that we have listed as approved we will not be testing in automarking.
3.2.1. Approved Assumptions
Section titled “3.2.1. Approved Assumptions”This list will be updated when new valid assumptions and posts are made on the forum. Please post questions in their own individual posts.
3.2.1.1. MVP assumptions
Section titled “3.2.1.1. MVP assumptions”- The behaviour when a bomb explodes while other bombs exist in its radius is undefined
- If the cumulation of defence buffs is high enough to reduce the enemy’s attack to 0, the behaviour is undefined
- Trying to mind control/bribe an ally that is already mind controlled/bribed is undefined.
- The behaviour of a moving entity, e.g. merc or player is on the square when a door closes, is undefined
- When a boulder is on top of a collectable entity it just sits there and nothing happens to the collectable. You will need to move the boulder in order to collect it.
3.2.1.2. Task 1) Code Analysis and Refactoring (30 marks)
Section titled “3.2.1.2. Task 1) Code Analysis and Refactoring (30 marks)”a) From DRY to Design Patterns (6 marks):
- None so far
b) Pattern Analysis (6 marks):
- None so far
c) Inheritance Design (6 marks):
- None so far
d) Open Refactoring (12 marks):
- None so far
3.2.1.3. Task 2) Evolution of Requirements (30 marks)
Section titled “3.2.1.3. Task 2) Evolution of Requirements (30 marks)”The following behaviour is all undefined, and we will not test for it.
Option A — Logic Switches (20 marks):
- A player cannot pick up the wire and light bulb and store them in their inventory
- Whether the player can stand on light bulbs is undefined
- The behaviour of whether boulders can be pushed onto wires & lightbulbs is undefined
- Any scenario where the order in which activated components perform their action is undefined
- For example, this case where a logical bomb might activate and destroy parts of a circuit before other logical components are able to activate
bomb radius is 1;- : wire, S: <switch>, B: <or bomb>, L: <or light>;dungeon:S - - - - - - LB1 B2
Option B — Powerups and Potions (30 marks)
- None so far
3.3. Test Design 🐝
Section titled “3.3. Test Design 🐝”When it comes to writing tests for the new features, you should write functional tests on the controller.
All of the existing tests in the monolith are written in this way, and you can structure your tests similarly.
3.4. Dungeon Map Helper
Section titled “3.4. Dungeon Map Helper”We’ve provided a dungeon map helper here for you here to assist with visualising and creating test maps.
Please note it is not comprehensive (not all entities and fields are provided), and it may contain some bugs!
4. Blogging
Section titled “4. Blogging”The role of blogging in this assignment is to let your markers know that you understand what you are doing. You do no need to write 1000 words for each task - more concise blogs usually demonstrate that you know what your talking about without needing to ramble. You are free to write in dot points or short sentences, and you should be focusing more on why you made the decisions you did, rather than recounting what you changed (we want to see your thought process). Apart from that, you should also:
- Complete your blog using the provided template.
- Include documentation of your design decisions for each coding task.
- You might want to show the evolution of your design through your blog, and reflect on your initial ideas - were there any issues? What did you do to fix them?
- Only include Merge Request links from GitLab.
- Links to external sources (e.g., Google Drive, Word documents) will not be marked and will be ignored.
- Your assessment will be based solely on the contents of your GitLab repository.
5. Assessment
Section titled “5. Assessment”5.1. Marking Criteria
Section titled “5.1. Marking Criteria”| Task | Subtask | Criteria |
| Task 1 ⚙️ 30 marks |
a) From DRY to Design Patterns (6 marks) |
|
| b) Inheritance Design (6 marks) |
|
|
| c) Open-Closed Goals (6 marks) |
|
|
| d) Open Refactoring (12 marks) |
For 4 marks, some additional smells/flaws are identified and resolved. For 6 marks, listed additional smells/flaws (or equivalent) are identified and resolved. For 12 marks, substantially more additional smells/flaws are identified and resolved, equivalent to double that of the 6 mark criteria. |
|
| Task 2 🔧 30 marks |
For either task completed: Option A — Logic Switches (20 marks) Option B — Powerups and Potions (30 marks) |
Software Correctness (40% of the marks for the subtask) This section will be automarked. Software Design (50% of the marks for the subtask)
|
| Easy Marks 🧂 5 marks |
Code Hygiene 🚿 |
You will receive 0/5 marks in the Easy Marks section if you fail to meet any of the following requirements:
main branch of your repository must remain green (i.e. passing) for the entire assignment.If pipelines are running slowly, you’re expected to run linting and tests locally. If they pass locally, you may force merge. The purpose of the pipeline is to help you keep main in a working state. It’s not a hard requirement for merging.Slow pipelines are not a valid excuse for failing to meet these requirements or for not merging to main.
|
| Merge Requests 🧭 |
You will get 0/5 marks in this Easy Marks section if you:
|
5.2. Submission
Section titled “5.2. Submission”We will take the contents of your main branch as your final submission. Any commits that are made on main after the deadline will be counted as a late submission. Commits to branches other than main, or open (not merged) merge requests will not be accepted as a valid submissions.
You may be asked to explain your code or design choices to a member of staff as part of your submission.
5.3. Dryruns
Section titled “5.3. Dryruns”To ensure your code compiles with our automarker and basic functionality works as expected we have provided you a basic dryrun test. If your code does not compile with our automarker, you will receive 0 for the automarking section. Any code changes to fix the compilation issue will result in a non-negotiable 20% penalty. It is your responsibility to ensure your code compiles with our automarker.
You can find the dryrun files here: https://cgi.cse.unsw.edu.au/~cs2511/public/dryrun-files/dryrun_ass2/ .
Make sure you read all of the output!
5.3.1. Ensuring your code compiles with our tests through GitLab CI/CD pipelines.
Section titled “5.3.1. Ensuring your code compiles with our tests through GitLab CI/CD pipelines.”Every time you push code to the main branch on GitLab or create a merge request on GitLab, an automated pipeline will run that first:
- Compiles your code with your own tests
- Runs your tests
- Replaces your tests with our dryrun tests found here
- Checks if your code compiles with our tests
Note: If any of the previous steps fail, it will not run the next step.
You should try to maintain a green pipeline on the main branch at all times.
5.3.2. Ensuring your code compiles and passes with our tests through GitLab CI/CD pipelines.
Section titled “5.3.2. Ensuring your code compiles and passes with our tests through GitLab CI/CD pipelines.”Every time you push code to the main branch on GitLab or create a merge request on GitLab, you can click on the Green or Red indicator next to your commit. This should bring you to a page that looks like the following:
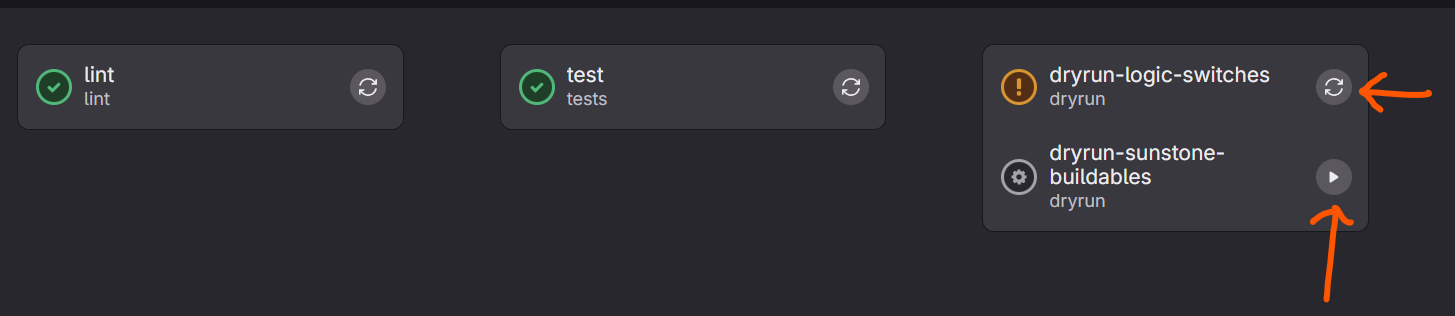
You can request a manual run of the pipeline by clicking on the Run button (see red arrow in image above). This will run the pipeline with the dryrun tests.
There are two tasks that can be executed. The task will run the dryrun tests for that specific option - either Logic Switches OR Powerups and Potions. You only need to pass the dryrun for the task 2 option that you have attempted. If the build fails, then you did not pass the dryrun test.